
Hey, I’m Chloe! If you want a showstopping whole chicken that is as easy as it is impressive, this oven version of beer can chicken is your new go-to. It gives you bronzed, crackly skin, incredibly juicy meat, and almost no babysitting. The method is fun to make and perfect for year-round cooking because the oven gives reliable, even heat. This post walks you through everything step by step, from the best spice rub to safety tips and Pinterest-ready photo ideas.

I test these recipes until they work every time, and this one reliably delivers a delicious, crowd-pleasing bird.
Why oven beer can chicken works so well
Beer can chicken gets its reputation from the upright cooking position that allows heat to circulate around the bird and steam to rise into the cavity. In the oven you get the same benefits as on the grill but with more control: consistent temperature, no weather worry, and predictable timing. The liquid in the can creates steam that helps keep the meat moist while the outside crisps up. Plus, the upright setup creates a dramatic presentation for the table.
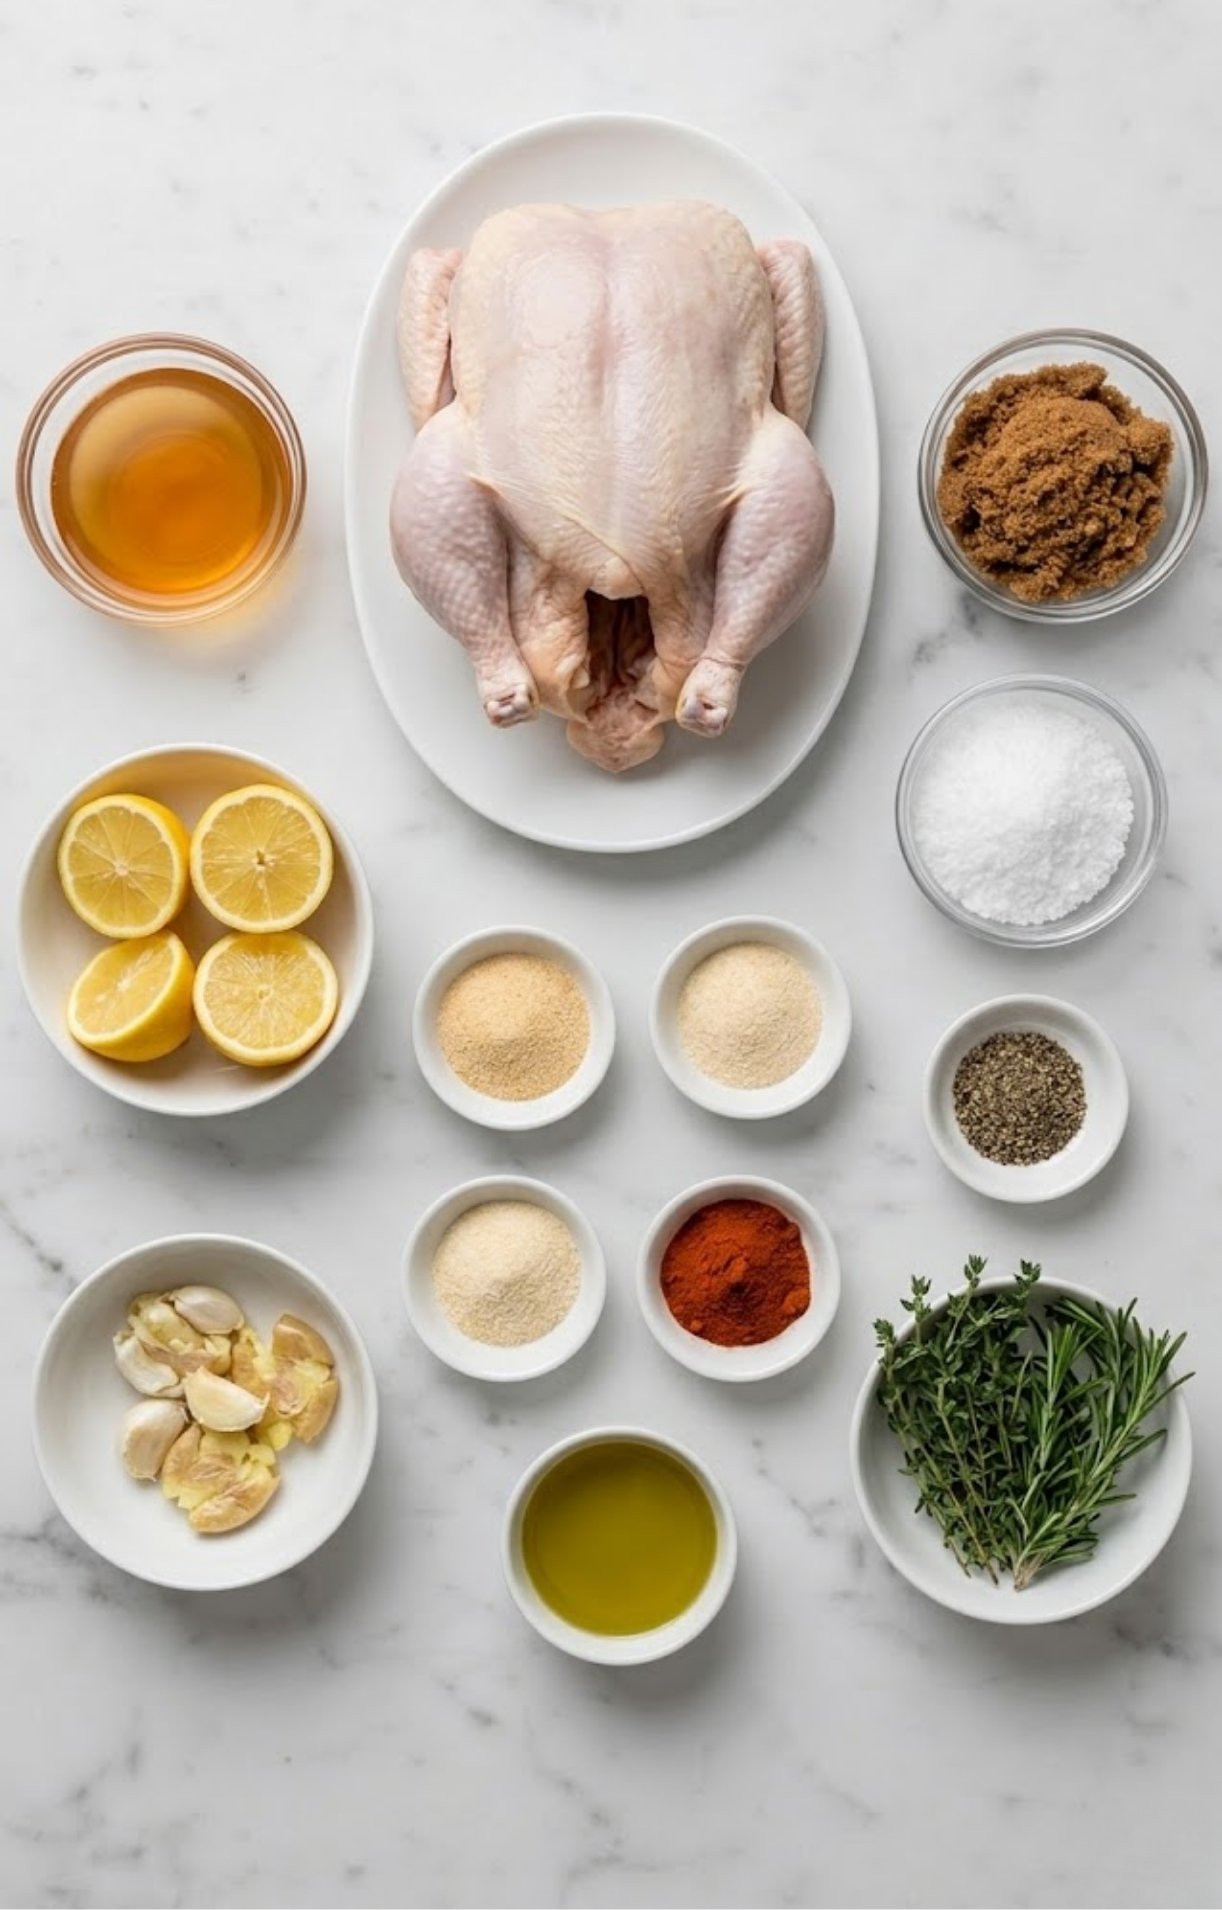
Ingredients You Need
- Whole chicken, giblets removed
- Beer, nonalcoholic beer, or chicken broth with apple cider vinegar
- Brown sugar
- Kosher salt
- Ground black pepper
- Garlic powder
- Onion powder
- Smoked paprika or regular paprika
- Olive oil or avocado oil
Optional aromatics:
- Lemon halves
- Smashed garlic cloves
- Fresh thyme or rosemary sprigs
For precise amounts, check the recipe card at the end of the post.
Tools that make this easier
- A roasting pan with a rack or a rimmed baking sheet.
- A can opener and a sturdy spatula or tongs.
- An instant-read thermometer. This is essential. Do not skip it.
- A vertical poultry roaster stands as an alternative to using a can and gives a safer, steadier base.
Substitutions and variations
- No beer option: Use nonalcoholic beer or 1 cup chicken broth + 1 tablespoon apple cider vinegar. The steam is the functional part.
- Spicy rub: Add ½ teaspoon cayenne pepper or 1 teaspoon chili powder to the rub.
- Herb-forward: Mix 1 tablespoon dried herbes de Provence or Italian seasoning into the rub. Tuck fresh rosemary and thyme in the cavity.
- Smoky: Replace regular paprika with smoked paprika and add a few liquid smoke drops to the can liquid if you want a hint of smoke without a smoker.
Prep checklist (what to do before you start)
- Preheat the oven to 425°F. Position a rack in the center so the chicken has room to stand upright.
- Line the roasting pan with foil for easier cleanup if you like.
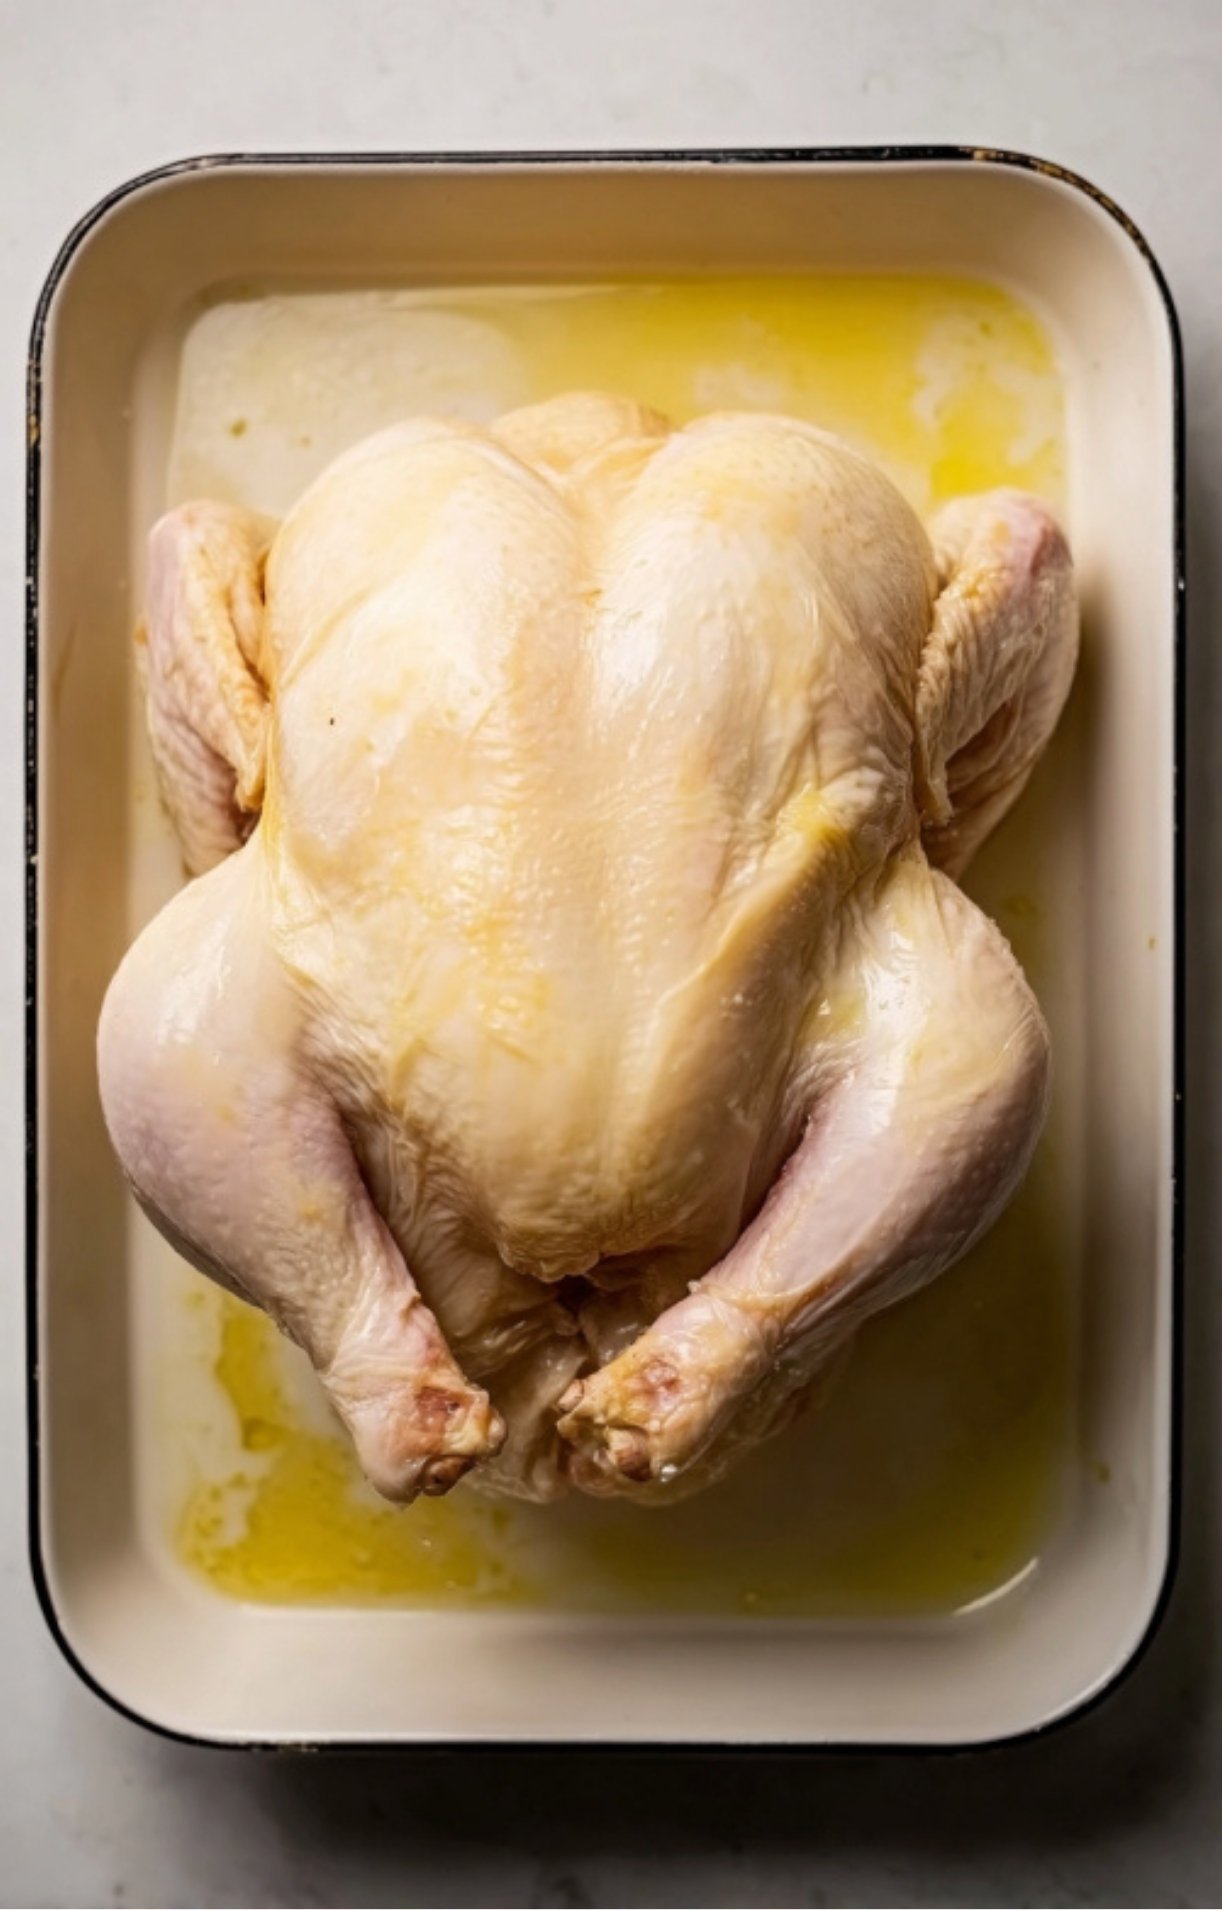
- Remove giblets and pat the chicken thoroughly dry. Dry skin equals crispier skin.
- If you plan to brine, do that 2 to 4 hours ahead. I have a brine option below.
How to make Oven-Roasted Beer Can Chicken step-by-step
Instructions
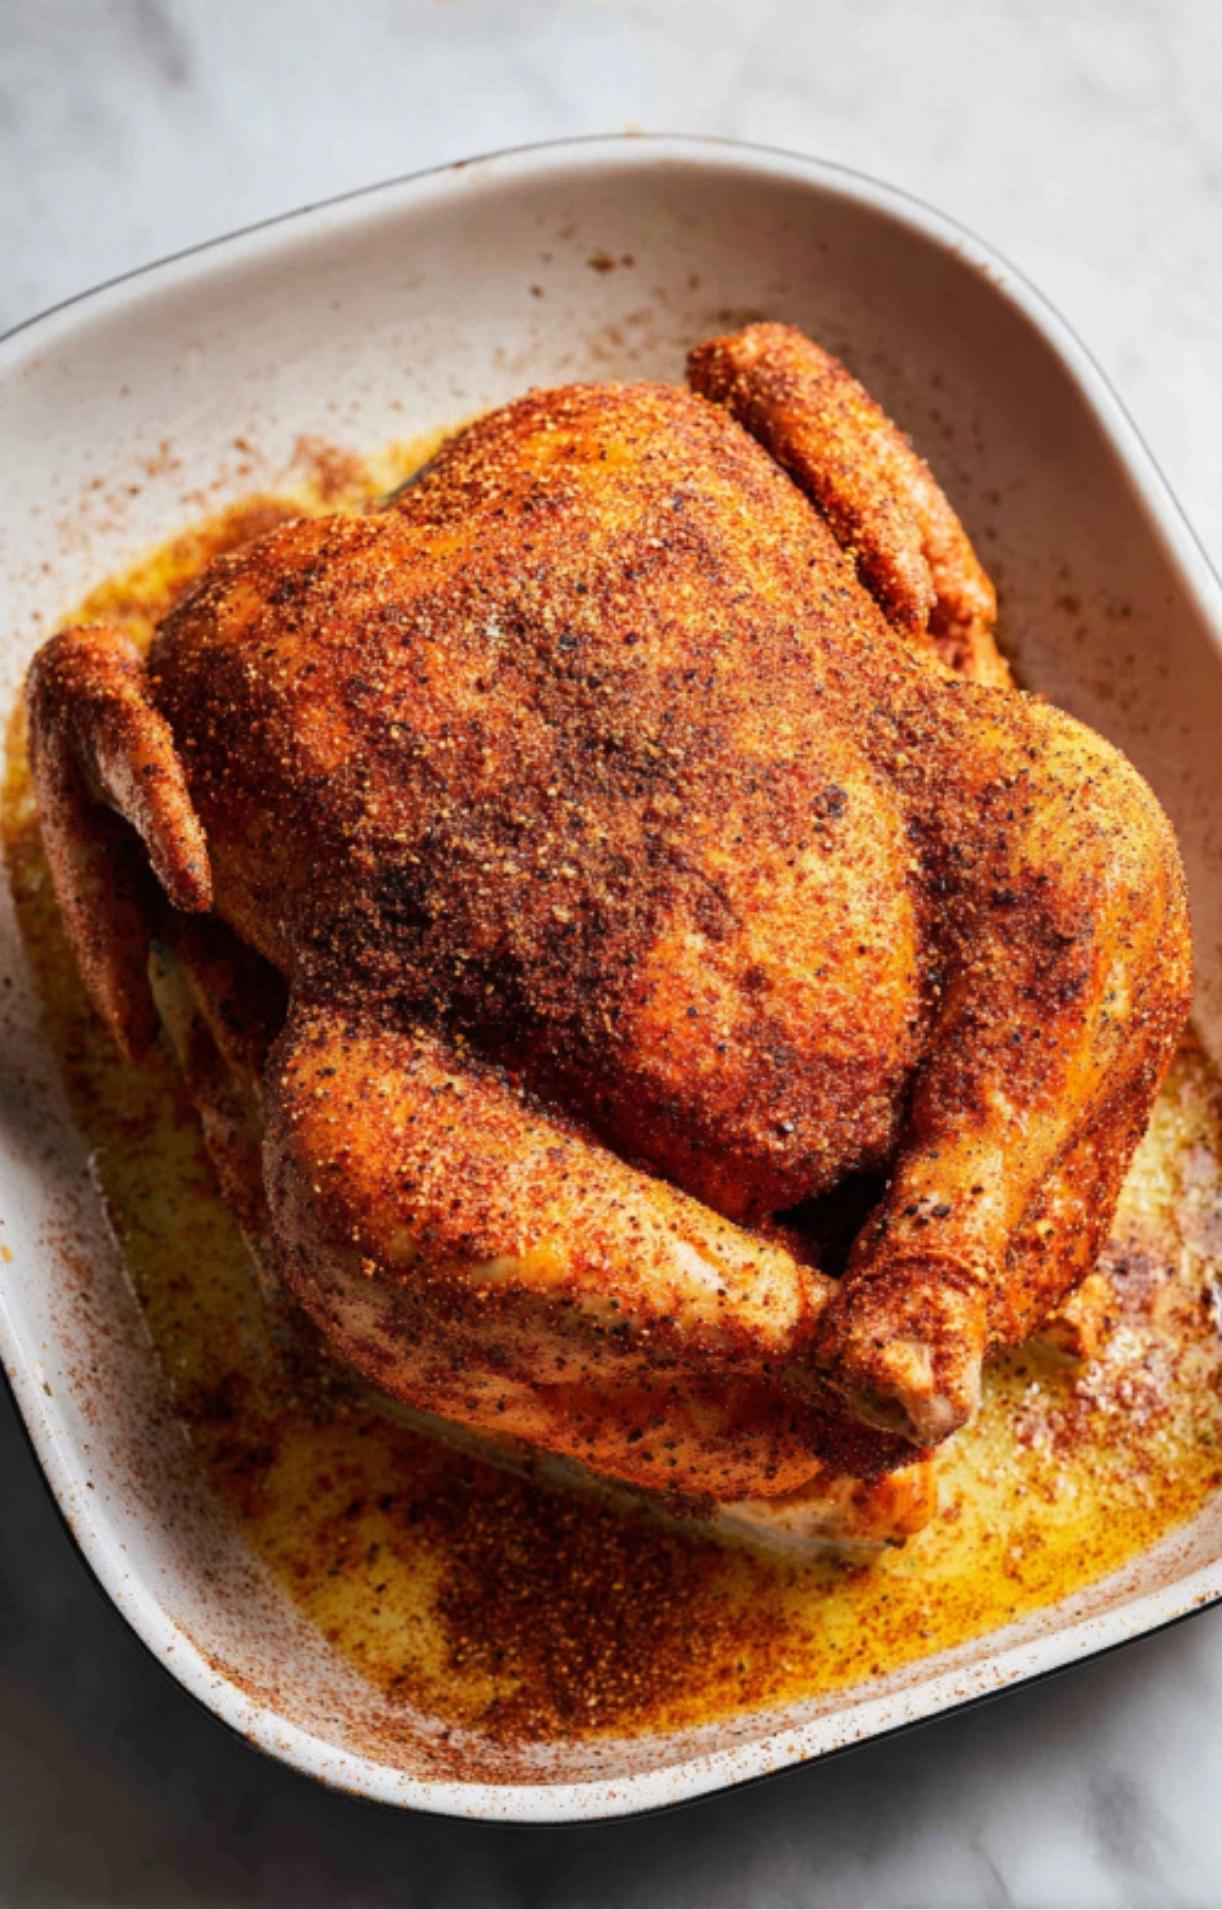
- Preheat oven and make the rub. Preheat your oven to 425°F. In a small bowl whisk together brown sugar, kosher salt, black pepper, garlic powder, onion powder, and smoked paprika.
- Oil and season the bird. Rub the chicken all over with the olive oil. Loosen the skin gently over the breast and thighs and rub a little spice directly on the meat under the skin, then rub the remaining spice mix all over the outside.
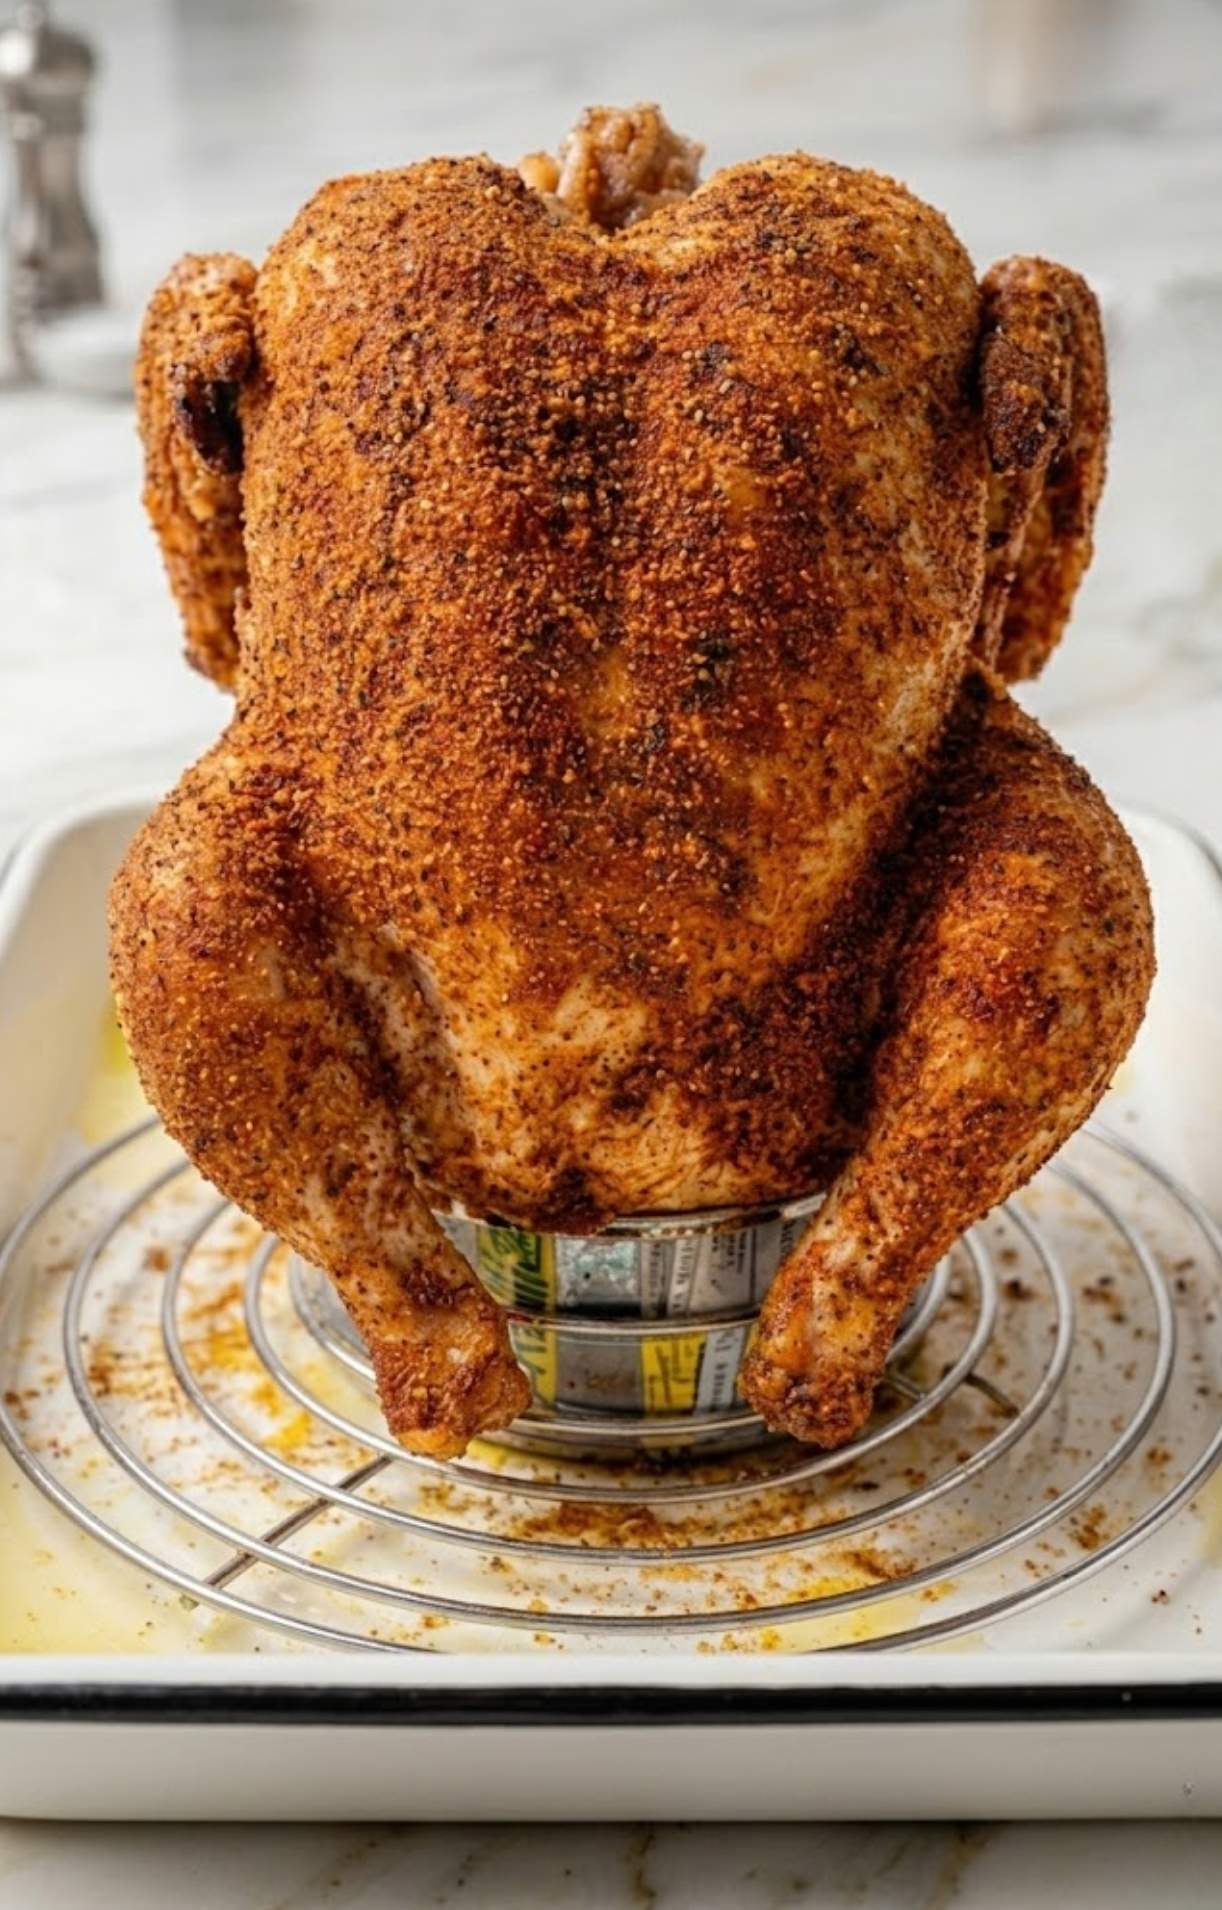
- Prepare the can. Open the beer and pour out or drink about one third. If you prefer not to use alcohol, use nonalcoholic beer or fill a cup or small can with low-sodium chicken broth and 1 tablespoon apple cider vinegar. Pour a small amount of the liquid into the bottom of the roasting pan to catch drips.
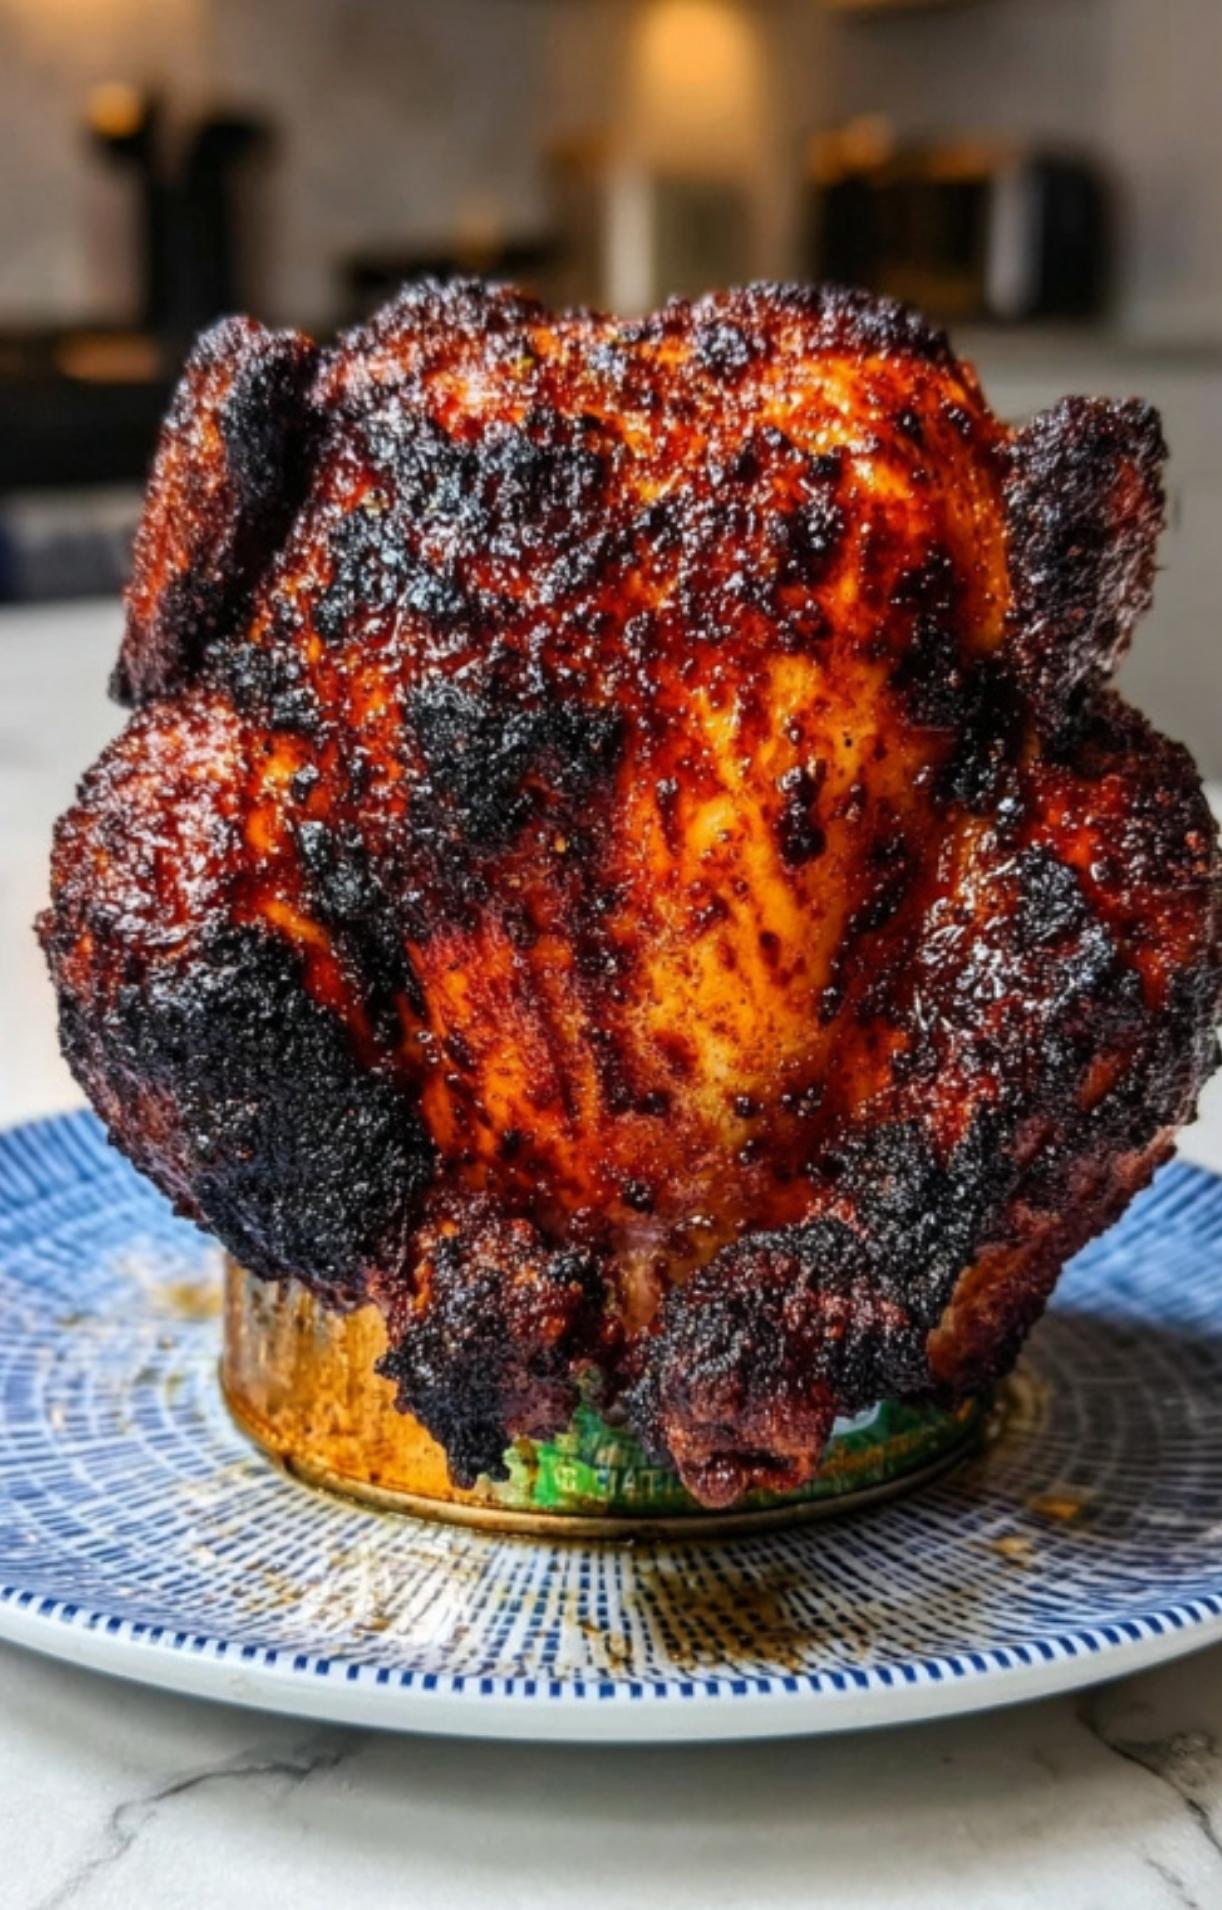
- Mount the chicken. Place the beer can in the center of the roasting pan. Carefully slide the cavity of the chicken over the can so the bird sits upright. The legs should form a tripod with the can for stability. If the bird wobbles, use a vertical roaster or fashion a foil ring to steady the base.
- Roast. Place the pan in the oven and roast for about 1 hour and 15 minutes to 1 hour and 30 minutes depending on bird size. After 45 minutes check color. If the skin is browning too quickly, tent with foil. The chicken is done when an instant-read thermometer inserted between the wing and the thigh reaches 165°F and the thickest part of the thigh is around 175°F for tender dark meat.
- Rest and remove the can. Remove the pan from the oven and move the bird with tongs to a cutting board near the sink. Slide the chicken so the can hangs over the sink and carefully pull the can free. Discard the can contents safely. Let the chicken rest for 10 to 15 minutes before carving.
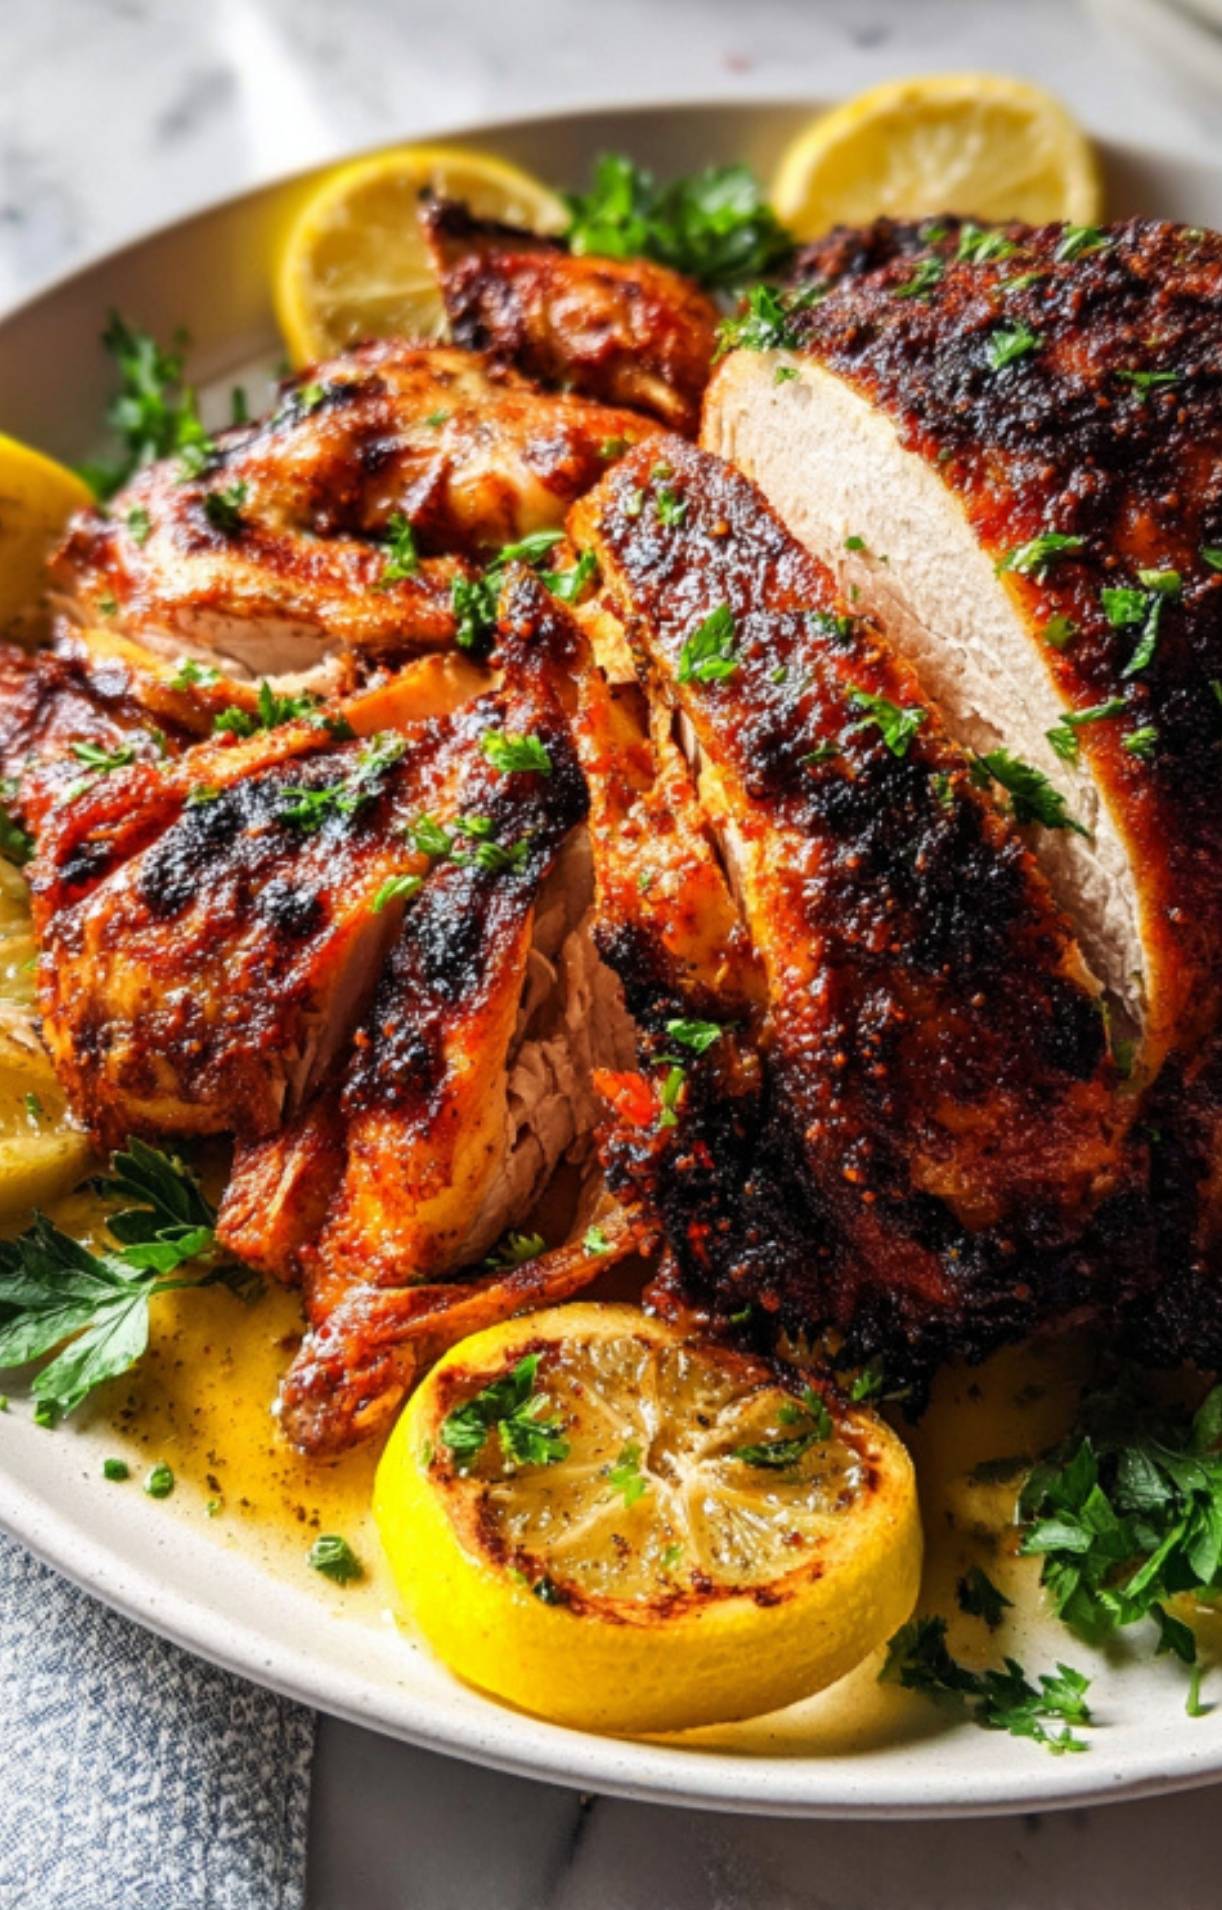
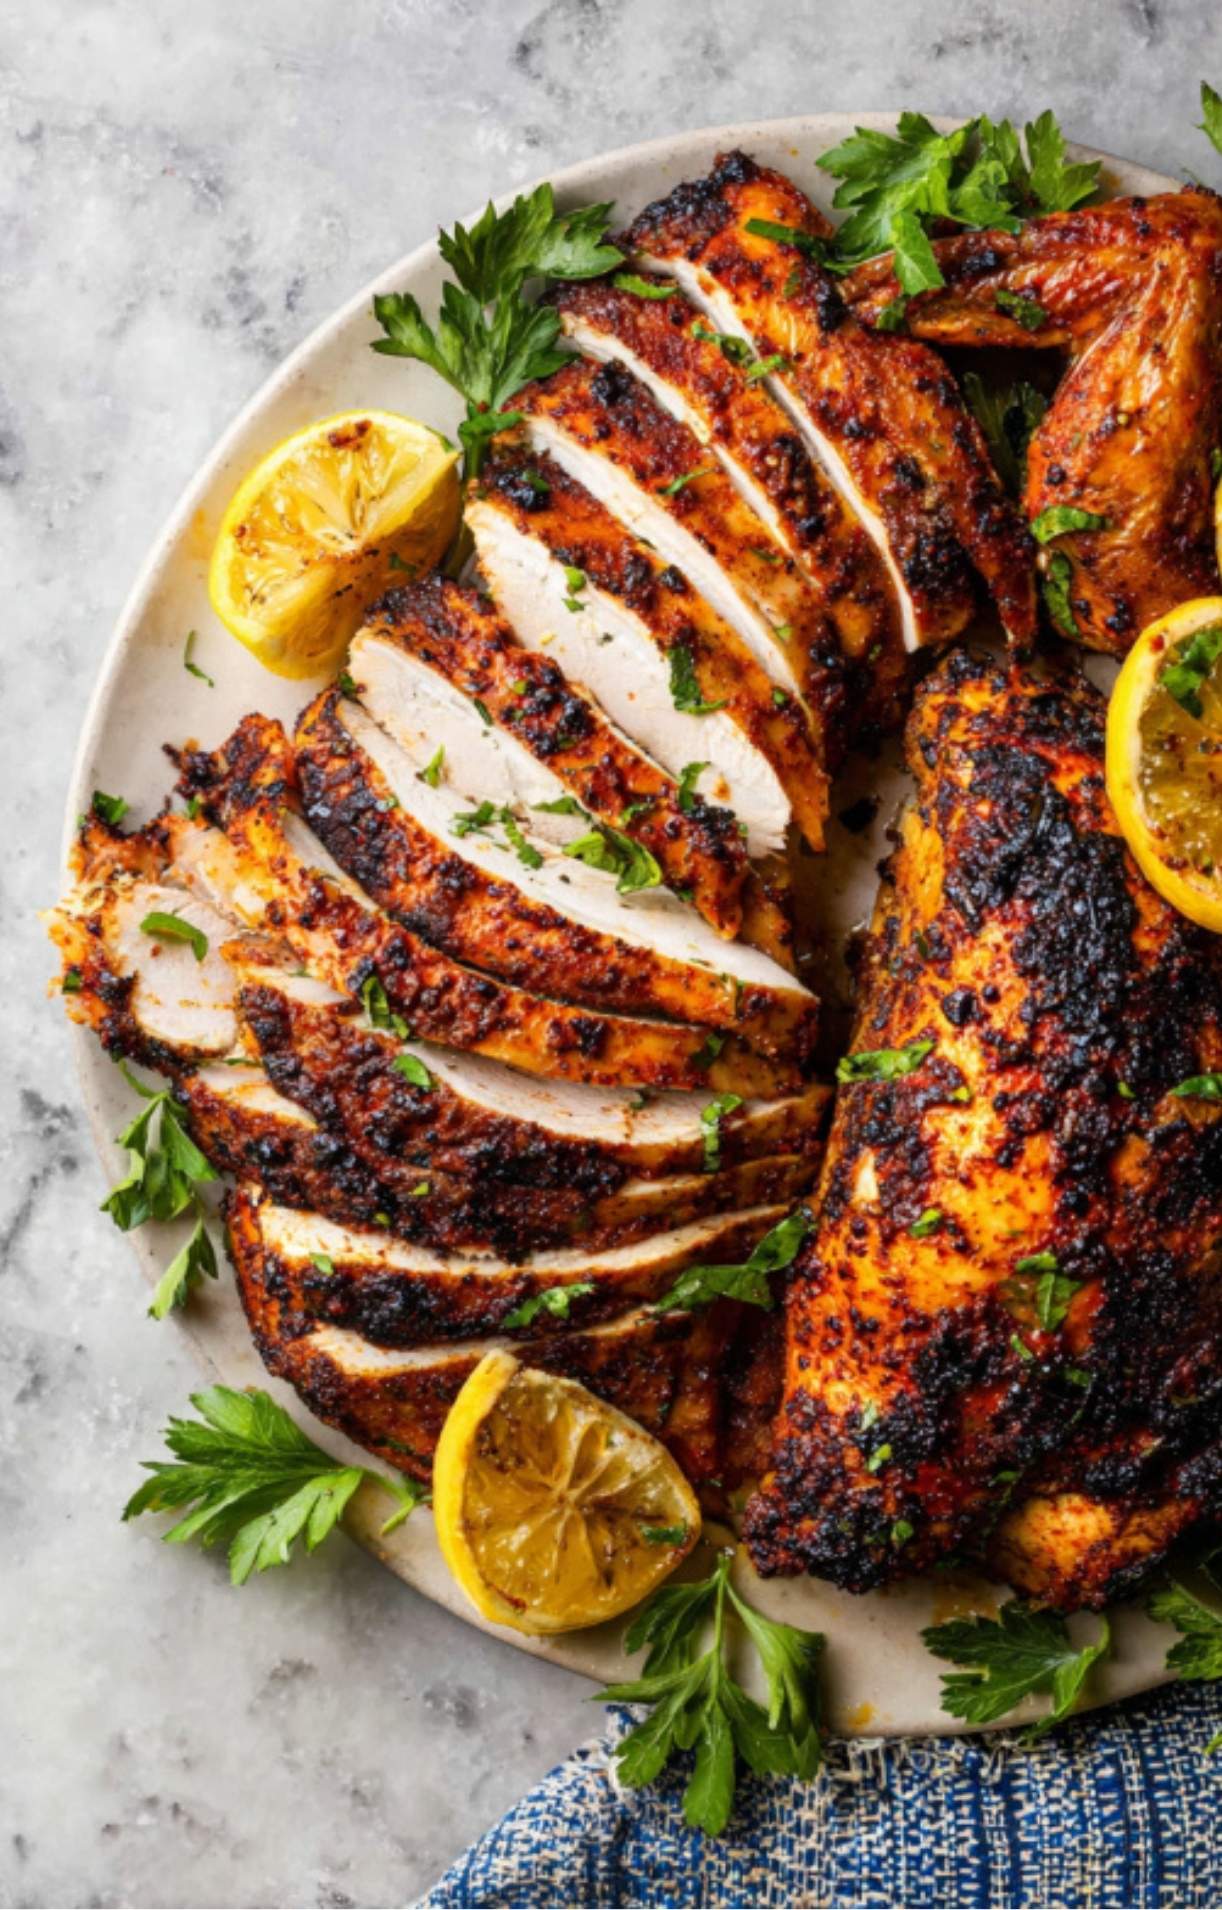
- Carve and serve. Slice the breast meat and remove the legs and thighs. Arrange on a platter and garnish with fresh herbs or lemon wedges.
Brine option for extra moisture (optional but recommended)
If you want an insurance policy for ultra-juicy meat, brine for 2 to 4 hours:
- Brine: 4 cups water, ¼ cup kosher salt, ¼ cup brown sugar, optional 2 smashed garlic cloves and a few peppercorns. Dissolve salt and sugar, cool the solution, submerge the chicken and refrigerate. Rinse thoroughly and pat dry before seasoning.
Why temperature matters and thermometer guidance
The visual alone does not guarantee doneness. An instant-read thermometer is the only reliable way to know your bird is safe and perfect. Check the thickest part of the breast and the thigh. The USDA safe minimum internal temperature for chicken is 165°F. For the best texture, many cooks take the thigh to about 175°F and let carryover heat finish the breast.
Safety tips for working with the can
- Do not fill the can to the top. Leave room to avoid hot liquid splashes.
- Be very careful when removing the can and tossing out the contents. The can will be hot and pressurized with steam. Hold the bird steady and pull the can away over the sink.
- If you prefer a safer option, buy a vertical poultry roaster. It gives stability and avoids exposed hot liquid.
Troubleshooting common issues
- Wobbly bird: Use a vertical roaster or make a foil ring base to steady the can. You can also halve a small can of tomatoes or fill the bottom of a short wide cup with vegetables for stability.
- Pale skin: For browning near the end, increase the oven to 450°F for the last 5 minutes while watching closely. Or set the broiler on high for 1 to 2 minutes but keep a close eye to prevent burning.
- Undercooked thighs: The thigh can take longer than the breast. If the breast reaches 165°F first, tent it with foil and give the thighs more time to reach 175°F.
- Dry breast: Let the chicken rest before slicing to allow juices to redistribute. Brining and cooking the bird to precise temperatures help prevent dryness.
Serving suggestions and side pairings
This oven beer can chicken is dinner-party friendly and easy to pair:
- Oven-roasted potatoes tossed with parsley
- Simple charred broccoli or green beans
- Creamy coleslaw or a bright lemon vinaigrette salad
- Cornbread or warm dinner rolls
Leftovers are fantastic: shred for sandwiches, tacos, or a hearty chicken salad.
Storage and reheating
- Refrigerate leftovers in airtight containers within two hours of finishing. Use within 3 to 4 days.
- Reheat in a 325°F oven covered with foil and a splash of chicken broth to keep meat moist. For smaller pieces, 15 to 20 minutes usually does it.
- Freeze shredded chicken in portioned freezer bags for up to 3 months.
Why this recipe is a great slot for featured snippets
Short, numbered instructions, clear timing, and formatted ingredient lists are prime for a featured snippet. The short instruction description above is optimized for search and for readers who want the quick how-to right away. Use Yoast SEO to mark the recipe times and structured data for maximum snippet potential.
FAQ
Yes. Use a vertical poultry roaster or stand the chicken on a heatproof, filled jar or small can specifically made for roasting. You can also pour the liquid into the bottom of the roasting pan and set the bird upright on a trivet so steam still reaches the cavity.
Yes, with common-sense precautions. Do not overfill the can, handle the hot can carefully, and use a roasting pan to catch drips. If you are worried about cans, use a purchased vertical roaster.
Light beers like lagers, pilsners, or citrusy ales complement chicken well. Dark stouts and porters can be too heavy. If you prefer alcohol-free, nonalcoholic beer or the broth-plus-vinegar option works great.
A 4 to 5 pound chicken roasted upright at 425°F generally takes 1 hour and 15 minutes to 1 hour and 30 minutes. Internal temperatures are the final judge: 165°F in the breast and about 175°F in the thigh for best texture.

beer can chicken oven
- Total Time: 1 hour 30 minutes to 1 hour 45 minutes
- Yield: 4 to 6 servings 1x
Description
This beer can chicken oven recipe delivers crispy, bronzed skin and fall-apart juicy meat with minimal effort. Roasted upright at 425°F, the steam from the can keeps the chicken moist while the spice rub creates bold, caramelized flavor. A reliable, year-round method that works beautifully for weeknights or entertaining.
Ingredients
- 1 (3 ½ to 5 lb) whole chicken, giblets removed
- 1 (12 oz) can beer, or nonalcoholic beer, or 1 cup low-sodium chicken broth plus 1 tablespoon apple cider vinegar
- 2 tablespoons dark brown sugar
- 2 tablespoons kosher salt
- 1 tablespoon ground black pepper
- 1 tablespoon garlic powder
- 1 tablespoon onion powder
- 1 tablespoon smoked paprika or regular paprika
- 3 tablespoons olive oil or avocado oil
- Optional: 2 lemon halves, 3 smashed garlic cloves, fresh thyme or rosemary sprigs
Instructions
- Preheat oven to 425°F and position rack in the center. Line a roasting pan with foil if desired.
- Mix brown sugar, kosher salt, black pepper, garlic powder, onion powder, and smoked paprika in a small bowl.
- Pat chicken dry and rub all over with olive oil. Loosen skin over breast and thighs and rub some spice under the skin, then coat the outside with remaining spice mix.
- Open the beer and pour out about one third. Pour a small amount into the bottom of the roasting pan. Place the can in the center and carefully lower the chicken onto the can so it stands upright.
- Roast 1 hour 15 minutes to 1 hour 30 minutes until the breast reaches 165°F and the thigh reaches about 175°F. Tent loosely with foil if browning too quickly.
- Remove from oven and carefully transfer to a cutting board near the sink. Gently remove and discard the hot can.
- Rest 10 to 15 minutes before carving and serving.
Notes
Use an instant-read thermometer for accuracy. Internal temperature should reach 165°F in the breast and about 175°F in the thigh. For extra juiciness, brine 2 to 4 hours before cooking. If the bird feels unstable, use a vertical poultry roaster. Be cautious when removing the hot can and steam.
- Prep Time: 15 minutes
- Cook Time: 1 hour 15 minutes to 1 hour 30 minutes
- Category: Dinner
- Method: Oven
- Cuisine: American
Nutrition
- Serving Size: 1 serving
- Calories: 430
- Sugar: 4 g
- Sodium: 820 mg
- Fat: 25 g
- Saturated Fat: 7 g
- Unsaturated Fat: 16 g
- Trans Fat: 0 g
- Carbohydrates: 6 g
- Fiber: 0 g
- Protein: 46 g
- Cholesterol: 155 mg
Leave a Reply